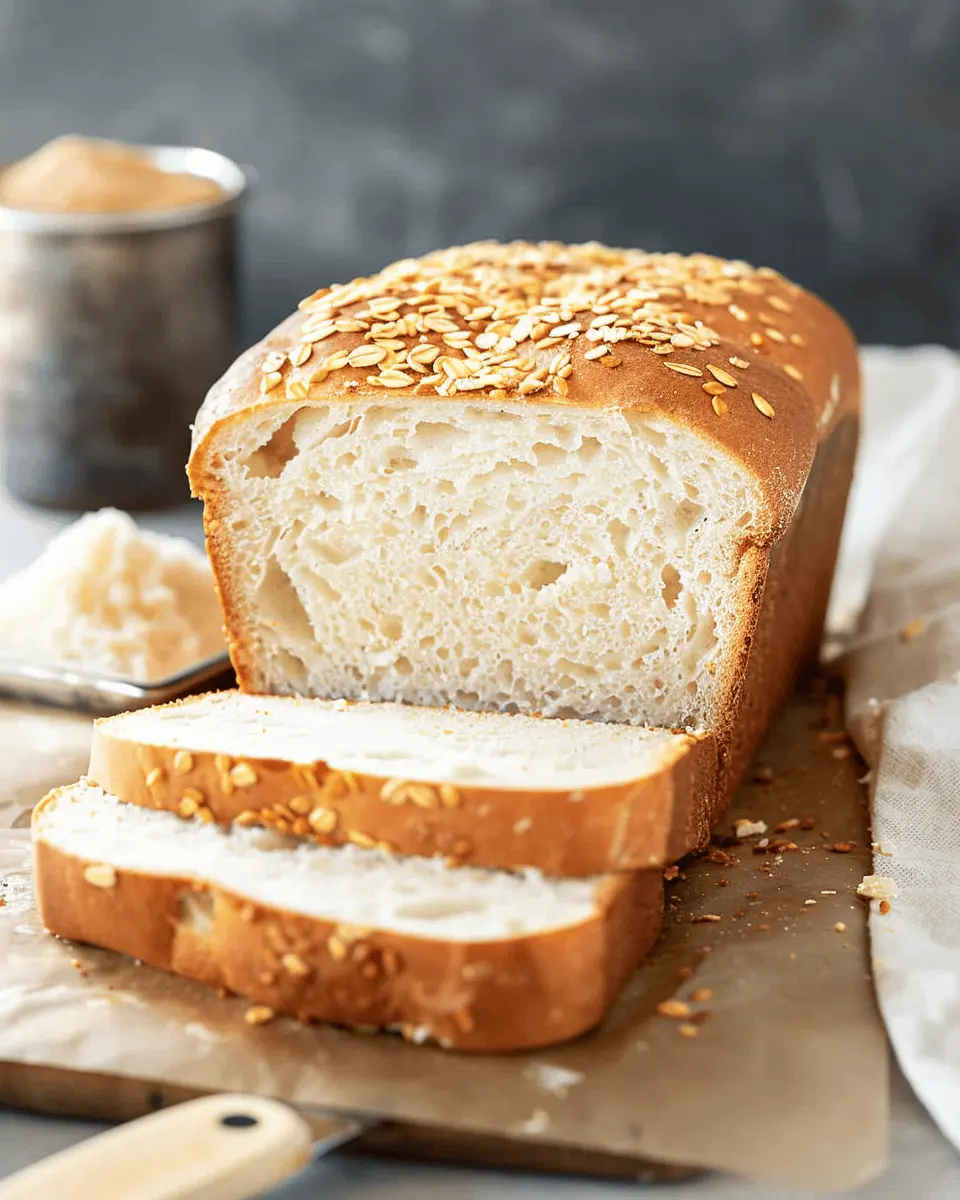
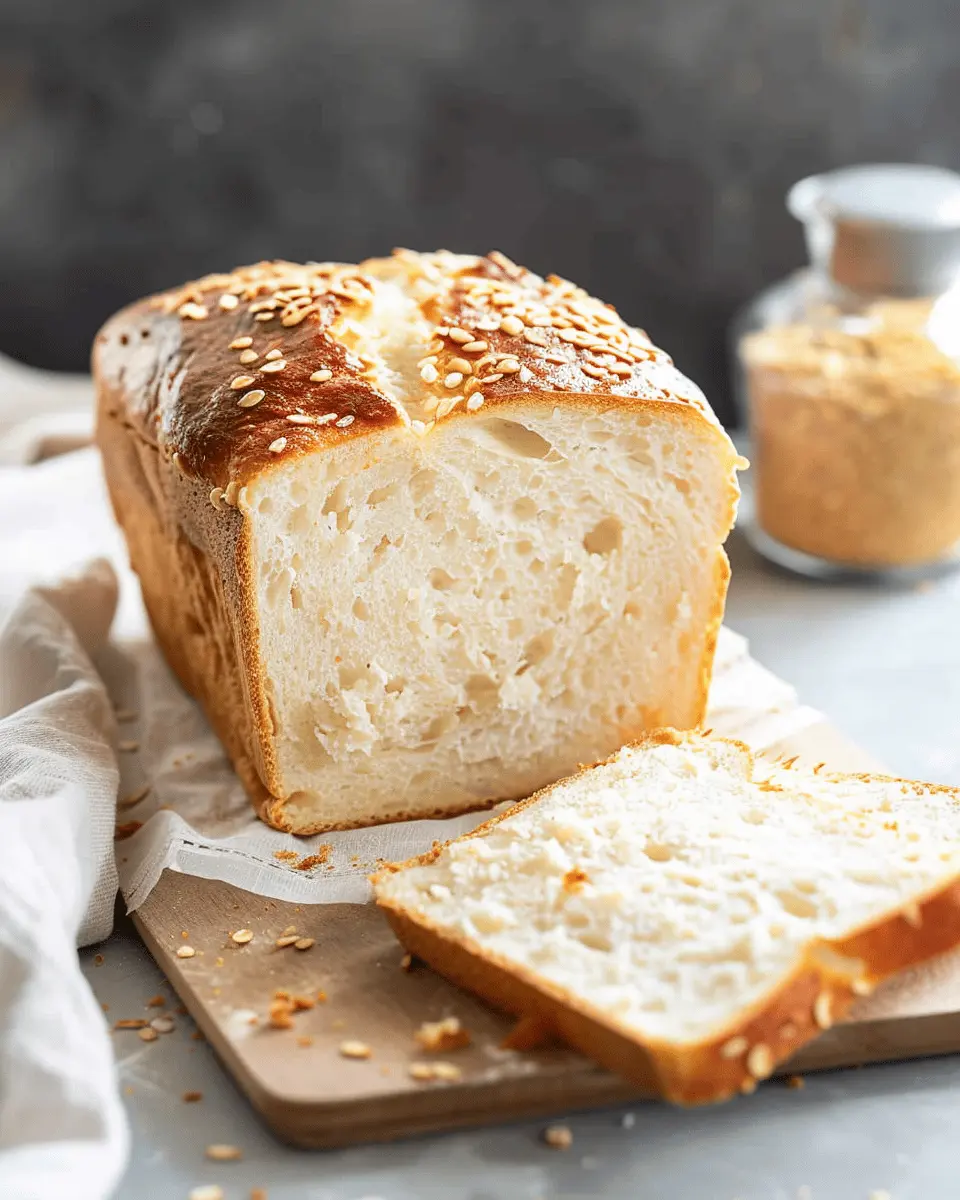
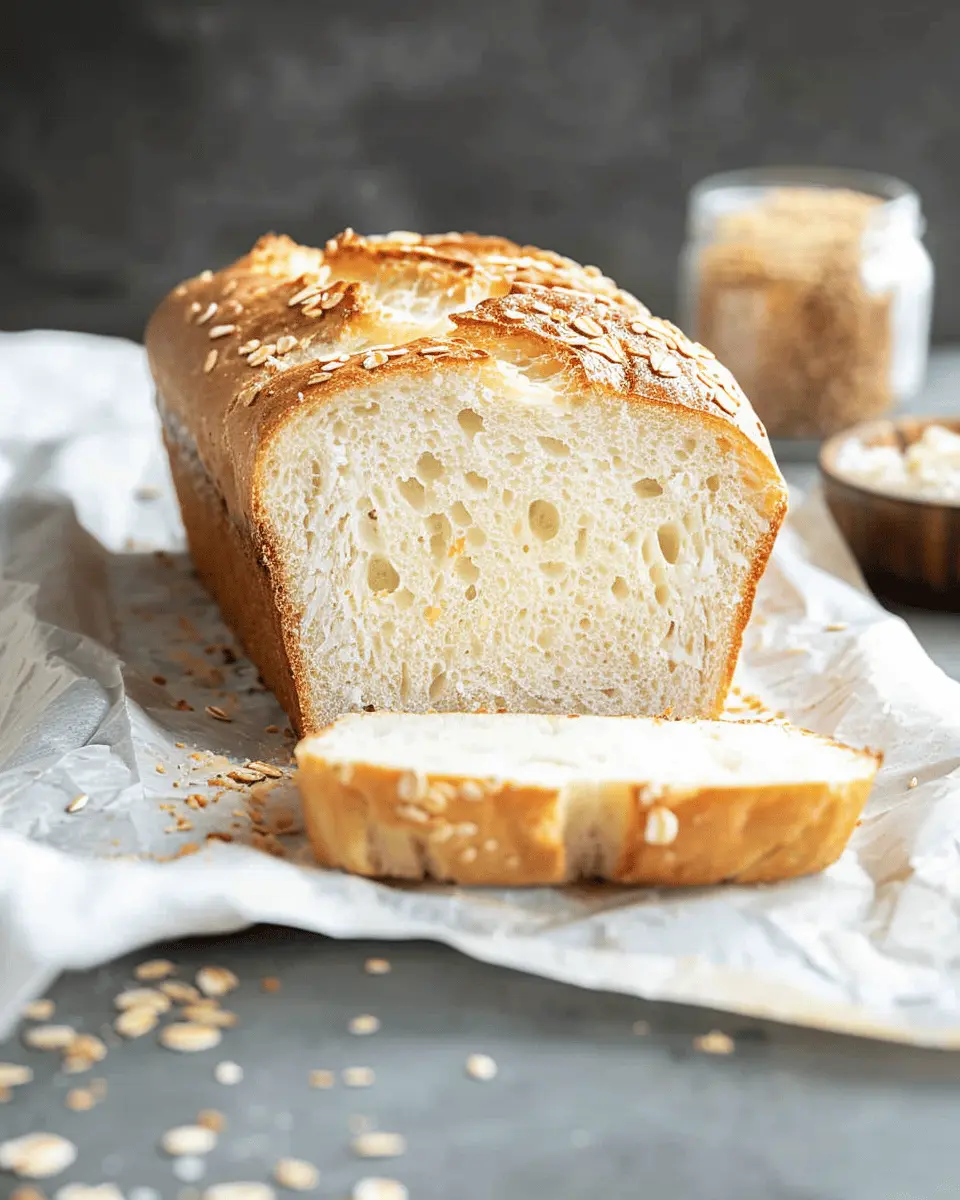
Introduction to Making the Best White Gluten-Free Bread
When it comes to baking, few things evoke the comfort of freshly baked bread. If you’re someone who’s navigating a gluten-free lifestyle, you might wonder if you can indulge in that same delectable experience. The answer is a resounding yes! Making the best white gluten-free bread at home not only satisfies your cravings but also allows you to tailor each bake to your personal tastes and dietary needs.
Why Choose Gluten-Free Bread?
The reasons for opting for gluten-free bread can vary widely. For many, it’s a necessity due to celiac disease or gluten intolerances. According to the Celiac Disease Foundation, approximately 1 in 100 people worldwide have celiac disease, and they must avoid gluten, which is found in wheat, barley, and rye. However, the gluten-free trend has attracted many who simply feel better when they eliminate gluten from their diet. If you’re one of those people, you might notice improved digestion, increased energy levels, and even clearer skin after going gluten-free.
But let’s be honest: the thought of giving up on that soft, savory slice of bread can be daunting. Many gluten-free bread alternatives available in stores can be quite dry or crumbly. That’s why learning how to make the best white gluten-free bread at home can be a game-changer. You’ll not only control the ingredients, ensuring they’re wholesome and fresh, but you’ll experience the joy of warm, fluffy bread right from your oven.
Here’s what you can look forward to:
- Discovering unique gluten-free flours like almond, coconut, or sorghum can elevate your bread’s flavor.
- You’ll master techniques that yield that lovely golden-brown crust and delightful interior – just like the bread you remember.
- Finally, you can create delicious sandwich versions using Turkey Bacon and Chicken Ham—perfect for your weekday lunches!
Ready to dive into your bread-making journey? Stick around as I guide you step-by-step through the process of crafting the best gluten-free loaf that doesn’t skimp on taste or texture. Let’s turn your kitchen into a delightful bakery! For tips on gluten-free ingredients, check out this resource from The Gluten-Free Baking Academy.
Ingredients for White Gluten-Free Bread
Essential ingredients you’ll need
To successfully embark on your journey of how to make the best white gluten-free bread, gather these key ingredients:
- Gluten-free all-purpose flour: This is your foundation. Look for a blend that includes xanthan gum or add it yourself for better texture.
- Yeast: Instant yeast works wonders here, giving your bread that lovely rise.
- Warm water: About 110°F (43°C) is perfect to activate the yeast without killing it.
- Olive oil: A couple of tablespoons add moisture and flavor; plus, it keeps the bread fresh.
- Sweetener: A teaspoon of sugar or honey can help feed the yeast.
- Salt: Essential for flavor, it makes your bread taste its best.
Useful kitchen tools
Having the right tools can make the process smoother:
- Mixing bowl: A large one is best for combining your ingredients.
- Whisk: For blending dry ingredients thoroughly.
- Lid or plastic wrap: To cover your dough as it rises.
- Loaf pan: A 9×5 inch pan works perfectly for shaping your bread.
With these ingredients and tools in hand, you’re ready to dive into creating your very own gluten-free masterpiece! For more insights on gluten-free baking techniques, check out resources from the Gluten Intolerance Group. They offer helpful guidelines on flour variations and more.
Step-by-Step Preparation for White Gluten-Free Bread
Making your own white gluten-free bread at home can feel a bit daunting, but with the right preparation and a positive attitude, you can create a delicious loaf that rivals any store-bought option. This guide breaks down the process into easy steps, ensuring you’re set up for success. Let’s get started!
Gather and Measure Your Ingredients
Before diving into the mixing and baking, take a moment to gather your ingredients. You’ll need the following:
- Gluten-free all-purpose flour: 3 cups (use a blend that contains xanthan gum, or add it separately)
- Instant yeast: 2 teaspoons
- Baking powder: 1 teaspoon
- Salt: 1 teaspoon
- Warm water: 1 cup (around 110°F)
- Honey or sugar: 2 tablespoons (for activating the yeast)
- Olive oil or melted coconut oil: 2 tablespoons
- Vinegar: 1 tablespoon (helps with the bread’s structure)
Measuring accurately can make a world of difference in baking. Avoid packing down the flour to ensure your bread is light and fluffy, just like you want it!
Combine Dry Ingredients
In a large mixing bowl, start by whisking together the dry ingredients: the gluten-free flour, yeast, baking powder, and salt. This step is crucial as it evenly distributes the leavening agents and ensures your bread rises beautifully. For added texture, consider adding seeds or herbs at this stage.
For more information on ingredient substitutions and quality guidelines, check out King Arthur Baking.
Mix Wet Ingredients
In a separate bowl, mix your wet ingredients: warm water, honey, oil, and vinegar. The warmth of the water activates the yeast, while the vinegar adds that essential touch of tanginess. Make sure your mixture is well-blended before adding it to the dry ingredients.
Did you know that using ingredients at room temperature can help improve the rise of your bread? It’s a little trick that goes a long way!
Create the Dough
Once your wet and dry mixtures are combined, stir them thoroughly until you form a cohesive dough. It should be slightly sticky but manageable. Unlike traditional bread, gluten-free dough won’t form gluten strands, so don’t worry about kneading it like usual.
If the dough seems too moist, sprinkle in some extra flour a tablespoon at a time until it reaches the right consistency.
Knead and Shape the Dough
While you won’t knead your gluten-free dough in the traditional sense, you will need to shape it. Use oiled hands to roughly form the dough into a loaf shape. Place the dough into a greased loaf pan. If you wish, you can create decorative swirls or patterns on the top for some visual appeal.
Let the Dough Rise
Cover your loaf pan with a clean kitchen towel and let the dough rise in a warm, draft-free environment for about 30-60 minutes, or until it has puffed up significantly. This rising period is vital, as it contributes to the texture and crumb structure of your white gluten-free bread.
You can also preheat your oven during the last 10-15 minutes of rising.
Bake the Bread
Now comes the exciting part: baking! Preheat your oven to 375°F (190°C) and bake the bread for about 25-30 minutes, or until the crust is golden brown and the bread sounds hollow when tapped.
To enhance the texture, you might consider brushing the top with a little oil or butter just before baking. That’ll give you a lovely, shiny crust that looks as good as it tastes!
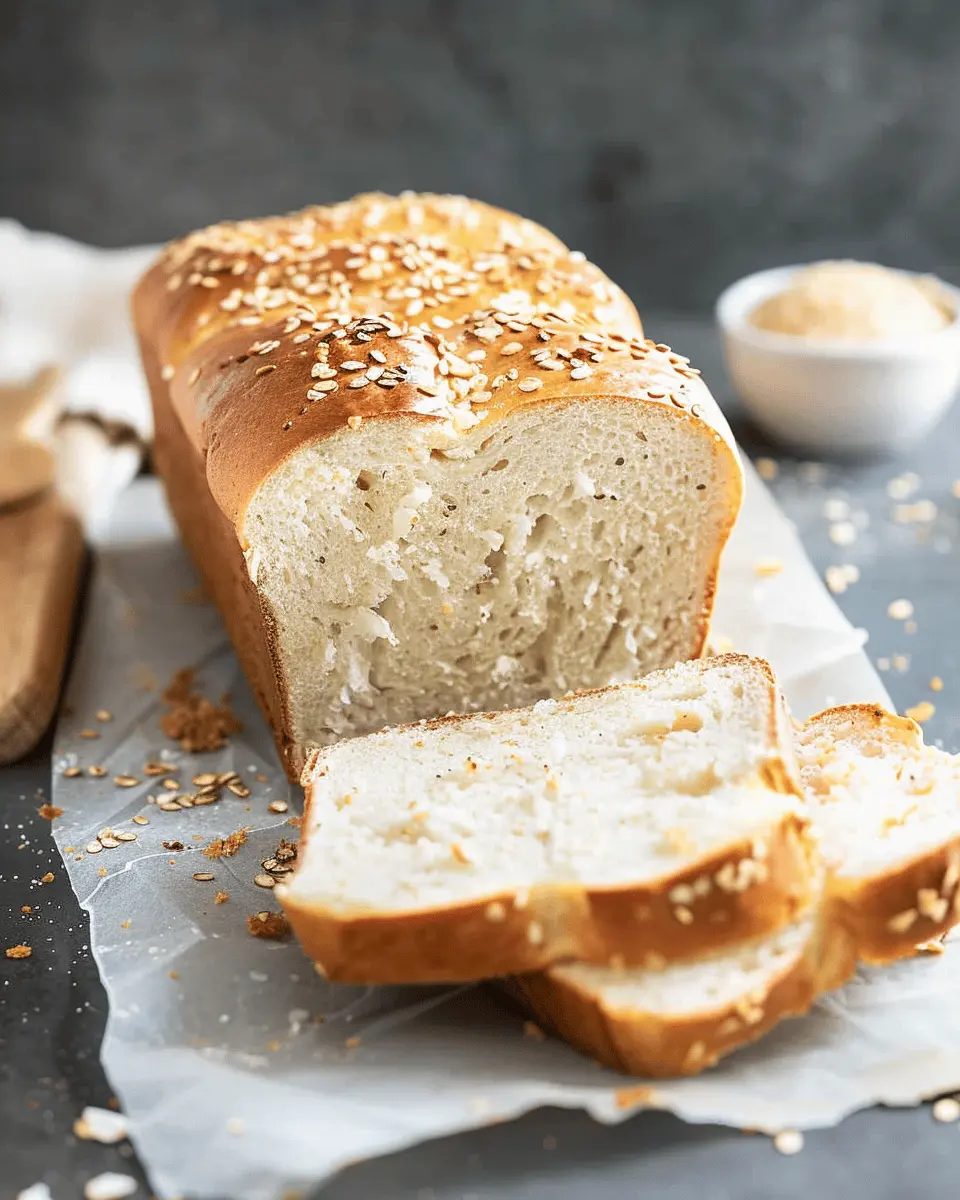
Once baked, allow the bread to cool in the pan for about 10-15 minutes before transferring it to a wire rack. This lets the steam escape and prevents sogginess.
Enjoy Your Homemade Creation
And there you have it! You’ve just completed the steps to make the best white gluten-free bread right in your own kitchen. Slice it up, add your favorite spreads, or even enjoy it with some turkey bacon for breakfast. What will you create with your fresh loaf? The possibilities are endless!
Variations of White Gluten-Free Bread
There’s no one-size-fits-all when it comes to gluten-free bread, and the best part? You can easily personalize it to suit your taste! Let’s explore some delightful variations that will transform your homemade bread into the star of any meal.
Herb-Infused Gluten-Free Bread
Do you love the earthy flavors of fresh herbs? Herb-infused gluten-free bread can elevate your sandwiches and toast to a whole new level! Incorporate a mix of your favorite herbs—such as rosemary, thyme, or oregano—into the dough before baking. Not only will it fill your kitchen with delightful aromas, but it will also create a savory experience that pairs perfectly with soups or salads. If you’re wondering how to make the best white gluten-free bread, this herbal twist might just be the answer you’ve been searching for!
Pro Tips:
- Use finely chopped fresh herbs for a vibrant flavor.
- Consider adding a touch of garlic powder for an extra kick.
Sweet Gluten-Free Bread
For those moments when you crave something a little sweeter, try your hand at sweet gluten-free bread. You can easily transform the basic recipe by adding ingredients like cinnamon, vanilla, or even mashed bananas. Imagine waking up to the delightful aroma of cinnamon raisin bread or indulging in a light, fluffy banana bread with your morning coffee! A drizzle of honey or maple syrup can add a touch of sweetness to elevate any meal.
Pro Tips:
- Experiment with dried fruits, such as cranberries or blueberries, for added texture and flavor.
- Swirl in some nut butter for a rich, satisfying taste.
For even more flavor, check out resources like Gluten Free Living or Smitten Kitchen for inspiration on varying your gluten-free bread! With a little creativity, you can make each loaf uniquely yours, ensuring every batch of homemade bread excites your palate.
Cooking Tips and Notes for White Gluten-Free Bread
Importance of Ingredient Temperature
When learning how to make the best white gluten-free bread, remember that the temperature of your ingredients can significantly affect your dough. Ideally, your liquids should be warm but not hot—around 100°F (37°C) is perfect. Yeast thrives in this environment, promoting a better rise. A quick tip? If you’re using eggs or other refrigerated items, let them sit out for a bit to reach room temperature before you start mixing.
How to Troubleshoot Dough Consistency
Getting the right dough consistency can be tricky, especially with gluten-free recipes. If your dough feels too dry, consider adding a bit more liquid—just a tablespoon at a time—to avoid an overly sticky mess. Conversely, if it’s too wet and gooey, mixing in a small amount of gluten-free flour can help balance it out.
When in doubt, don’t hesitate to check out resources on specialty gluten-free flours like those found on King Arthur Baking or Gluten-Free Living. These can provide additional insights that may prove invaluable in your bread-making journey.
By keeping these tips in mind, your venture into gluten-free bread baking will certainly be more successful!
Serving Suggestions for White Gluten-Free Bread
Tasty Spreads and Toppings
When you’ve mastered how to make the best white gluten-free bread, it’s essential to elevate your experience with delightful spreads and toppings. Here are some favorites:
- Avocado Smash: Creamy and nutritious, simply mash fresh avocado with a sprinkle of salt and pepper.
- Hummus: A great source of protein, spread your choice of hummus for a tasty Mediterranean twist.
- Nut Butters: Almond or peanut butter is perfect for a quick breakfast or snack, especially when topped with sliced bananas.
- Cream Cheese and Chives: Layering this decadent spread brings in a savory, gourmet feel.
Best Pairings for Meals
Pairing your gluten-free bread with hearty meals can transform how you enjoy your dishes. Consider these combinations:
- Grilled Cheese: Using your homemade bread, create the ultimate gluten-free grilled cheese with melty cheese and fresh herbs.
- Turkey Bacon Sandwich: Load it up with crispy turkey bacon, fresh lettuce, and ripe tomatoes for a satisfying lunch.
- Soups and Stews: Nothing complements a warm bowl of soup like a slice of toasted bread for dipping.
For more tips on meal pairings, check out this comprehensive guide on gluten-free meals. Enjoy your culinary adventures!
Time Breakdown for White Gluten-Free Bread
When learning how to make the best white gluten-free bread, it’s crucial to have a clear sense of timing. Here’s a quick breakdown to guide you through the process.
Preparation time
Getting everything ready will take about 15-20 minutes. This is when you’ll gather your ingredients, measure them out, and mix your dough.
Rising time
Patience is key! Allow your dough to rise for approximately 1 hour. This helps to develop that lovely texture we crave in gluten-free bread.
Baking time
Finally, you’ll need about 30-35 minutes for baking. The aroma that fills your kitchen during this time is simply irresistible!
Total time
All in all, the total time from start to finish is around 1 hour and 50 minutes. It’s worth every second when you bite into your freshly baked loaf!
For more insights on gluten-free baking techniques, check out The Gluten-Free Baker. Happy baking!
Nutritional Facts for White Gluten-Free Bread
When you’re exploring how to make the best white gluten-free bread at home, it’s essential to consider its nutritional content. This bread makes for a delightful addition to your meals, but knowing what you’re putting on the table is just as important.
Calories
A slice of white gluten-free bread typically contains around 100-120 calories. This makes it a versatile option for sandwiches or toast without overwhelming your calorie intake.
Protein
You’ll find about 2-4 grams of protein per slice. While not a significant source of protein, pairing it with spreads like nut butter or turkey bacon can enhance its protein profile.
Fiber
Fiber content ranges from 1 to 3 grams per slice, depending on the specific ingredients used. Considering that many gluten-free products lack fiber, you might want to add ingredients like psyllium husk or ground flaxseed to boost its content.
Sodium
Sodium levels can vary, but they typically hover around 150-200 mg per slice. If you’re watching your sodium intake, check labels or make your own to control salt levels.
For more detailed nutritional information, the USDA has comprehensive resources on different food products that you may find helpful as you embark on your gluten-free baking adventure.
FAQs about White Gluten-Free Bread
Can I use regular flour instead?
When it comes to how to make the best white gluten-free bread, the short answer is no! Regular flour contains gluten, which is essential for traditional bread structure but detrimental for gluten-free recipes. Instead, opt for gluten-free flours like almond, rice, or a pre-made gluten-free flour blend to achieve that soft texture you crave without any of the gluten vibes. For some tips and tricks on possible flour substitutes, check out this helpful guide on gluten-free baking.
How long will the bread last?
In terms of storage, homemade gluten-free bread usually lasts about 3 to 5 days at room temperature when kept in an airtight container. However, if you want to extend its shelf life, consider freezing it! Sliced or whole loaves can be stored in the freezer for up to 3 months. Just wrap it tightly in plastic wrap and place it in a freezer bag. When you’re ready to enjoy, simply toast or leave it on the counter to defrost.
What can I do if my bread doesn’t rise?
It’s disheartening when your loaf doesn’t reach its full potential. How to make the best white gluten-free bread often hinges on a few specific factors:
- Check your yeast: Make sure your yeast is fresh and activated. Combine it with warm water and sugar to see if it bubbles.
- Humidity matters: Gluten-free flours absorb moisture differently; adjust the liquid in your recipe accordingly.
- Temperature: Ensure your dough is in a warm place during rising, about 75°F to 80°F (24°C to 27°C) is ideal.
If you run into trouble, try researching techniques like the importance of temperature and humidity for effective bread making on trusted sites like King Arthur Baking. Happy baking!
Conclusion on Making the Best White Gluten-Free Bread
When you learn how to make the best white gluten-free bread, you unlock a world of delicious possibilities. This bread can be a game-changer for your meals, from hearty sandwiches to delightful toast. Remember, the key lies in choosing the right gluten-free flour blend and mastering your mixing and baking techniques.
Don’t just stop at this recipe; feel free to experiment with different add-ins like seeds or herbs to elevate your bread game. If you encounter challenges, or simply want to share your successes, the gluten-free baking community is always buzzing with advice. Check out resources like Gluten-Free Living and Celiac.org for even more tips. Enjoy your baking adventure!
PrintHow to Make the Best White Gluten-Free Bread at Home Easily
Learn how to make the best white gluten-free bread at home with this easy recipe!
- Prep Time: 10 minutes
- Cook Time: 35 minutes
- Total Time: 45 minutes
- Yield: 1 loaf 1x
- Category: Bread
- Method: Baking
- Cuisine: American
- Diet: Gluten-Free
Ingredients
- 2 cups gluten-free all-purpose flour
- 1 teaspoon salt
- 1 tablespoon sugar
- 1 tablespoon instant yeast
- 1/4 cup olive oil
- 1 cup warm water
- 2 eggs
Instructions
- In a large bowl, mix gluten-free flour, salt, sugar, and instant yeast.
- Add olive oil, warm water, and eggs to the dry ingredients.
- Mix until a smooth dough forms.
- Transfer dough to a loaf pan and let it rise in a warm place for about 30 minutes.
- Bake at 375°F (190°C) for 30-35 minutes.
- Let the bread cool before slicing.
Notes
- Ensure all ingredients are gluten-free.
- Store bread in an airtight container for freshness.
Nutrition
- Serving Size: 1 slice
- Calories: 150
- Sugar: 1g
- Sodium: 200mg
- Fat: 7g
- Saturated Fat: 1g
- Unsaturated Fat: 5g
- Trans Fat: 0g
- Carbohydrates: 20g
- Fiber: 2g
- Protein: 4g
- Cholesterol: 30mg
Keywords: gluten-free bread, white bread, homemade bread