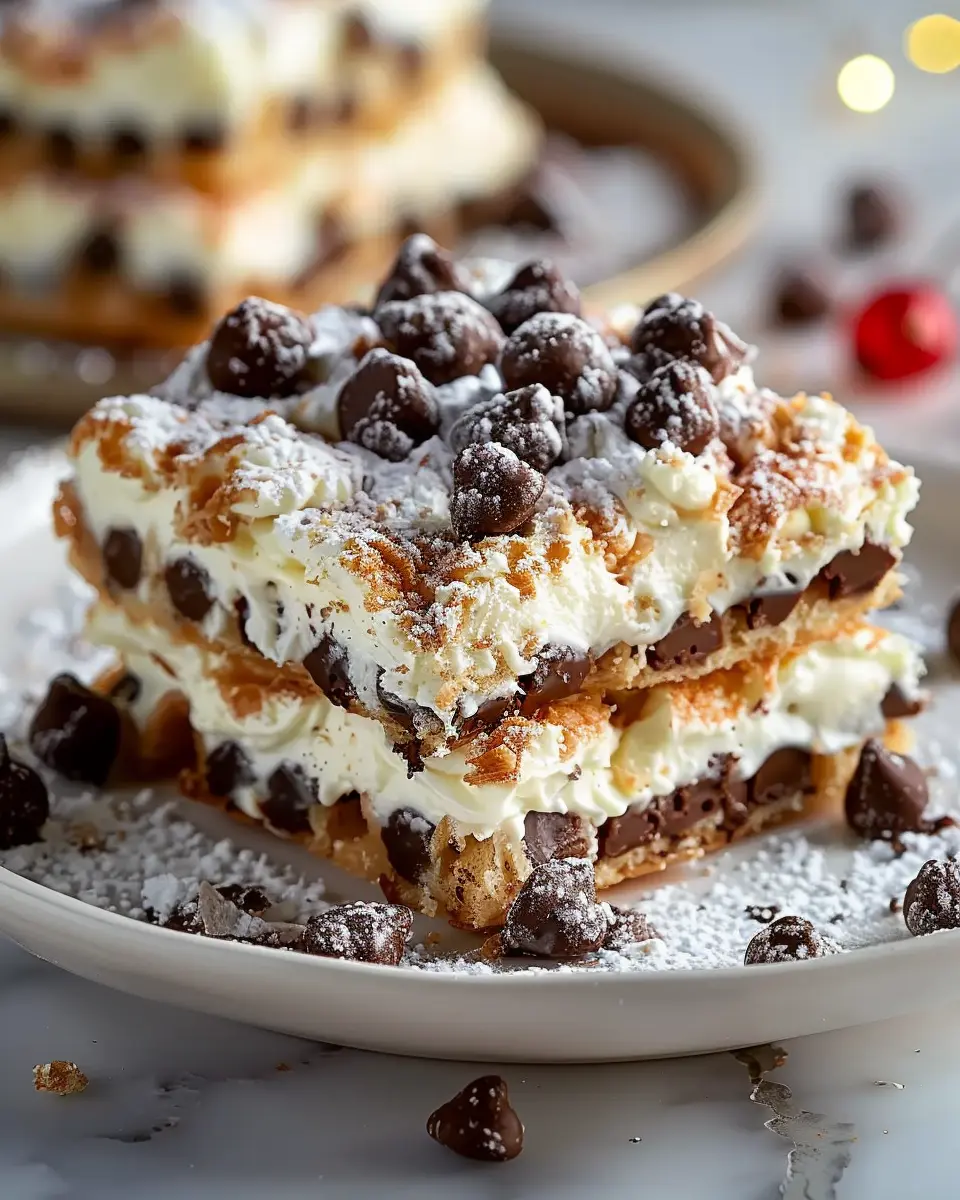
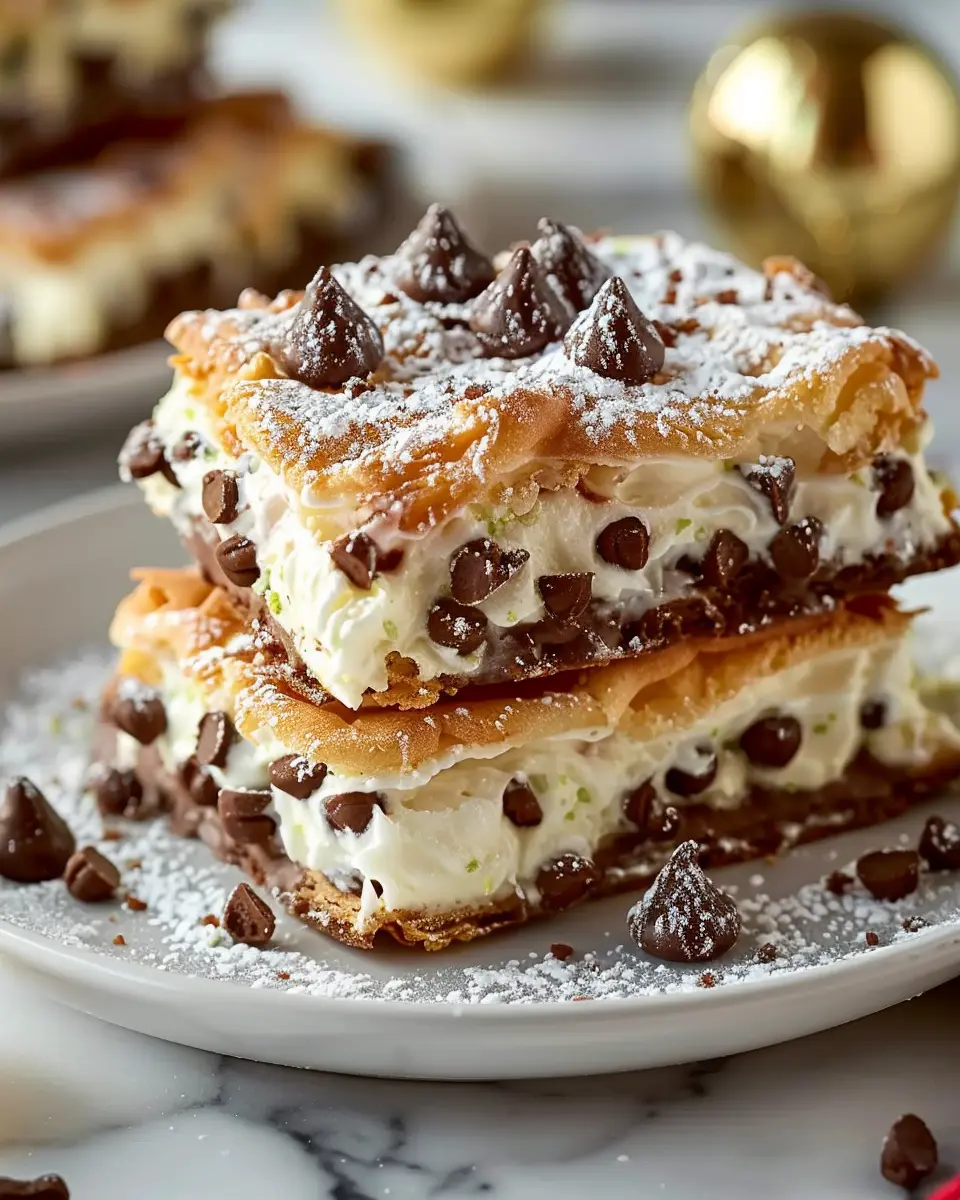
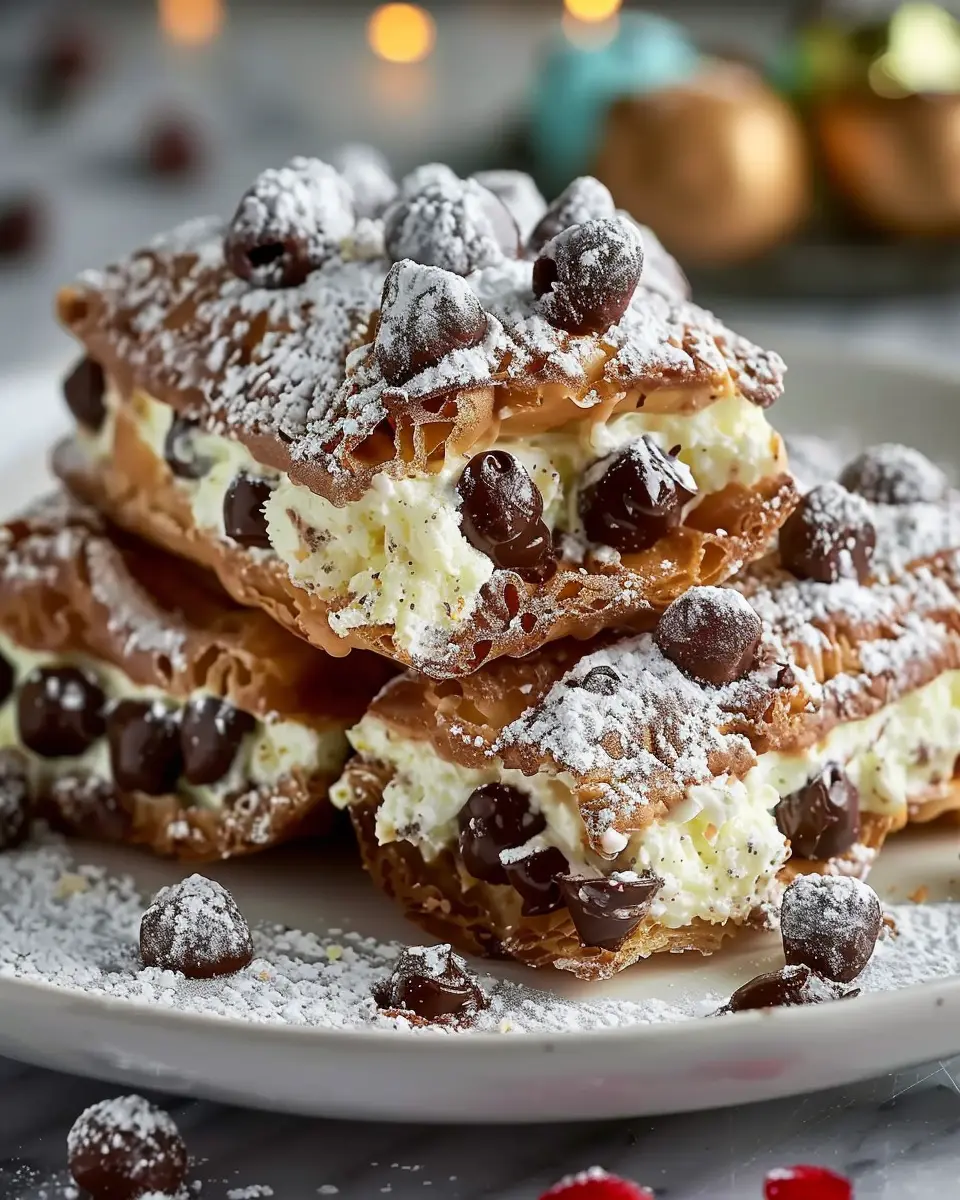
Introduction to Classic Cannoli Squares
There’s something undeniably charming about cannoli. These crispy pastries filled with rich, sweet ricotta and often adorned with chocolate chips or candied fruits deliver a delightful crunch followed by a creamy explosion of flavor. It’s no wonder that they hold a special spot in many hearts, and for good reason. Cannoli have an impressive history, originating in Sicily, where they are often seen at festive occasions and gatherings.
However, while traditional cannoli are delightful, they can also be a bit cumbersome to prepare and serve. This is where classic cannoli squares come into play, offering all the glorious flavors of the original dessert but in a much simpler and more approachable format. Imagine diving into a luscious slice that captures the same sweet filling and crunchy texture without needing to deal with fragile shells.
The Allure of Cannoli Made Easy
Incorporating the classic elements of cannoli into square form not only simplifies the experience but also makes it more suitable for gatherings or casual snacks. Here’s why everyone loves these delightful squares:
- Convenient Serving: No need to worry about filling individual shells. Just cut and share!
- Less Mess: Enjoy the flavors without the worry of pastry shells crumbling apart.
- Versatile Enjoyment: These squares make excellent party treats or even a delicious weeknight dessert.
The shift towards classic cannoli squares reflects a broader culinary trend of making beloved desserts more accessible. According to a report by Food & Wine, creative desserts that honor tradition while being easy to assemble are on the rise.
So, if you’re looking for a sweet treat that elevates your dessert game without the fuss, you’ll adore these classic cannoli squares. They maintain the joyous flavors you crave and allow for effortless serving at any gathering, making them a modern twist on a timeless favorite. Who wouldn’t want to celebrate with a slice of rich Ricotta goodness topped with chocolate and maybe a sprinkle of powdered sugar?
Get ready for a delightful baking adventure and let’s dive into this recipe!
Ingredients for Classic Cannoli Squares
Creating classic cannoli squares at home isn’t just about following the recipe; it’s about connecting with the flavors of tradition while adding your own twist. Here’s a breakdown of what you’ll need.
Essential ingredients for the cannoli shell
- All-purpose flour: This is the foundation of your shells. It provides the structure we need.
- Granulated sugar: Just a bit to sweeten the shell and balance flavors.
- Egg: Helps bind everything together.
- Unsweetened cocoa powder: Adds a delightful depth and slight bitterness to balance the sweetness.
- Butter: For that rich, buttery taste and flaky texture.
- Salt: A pinch is all you need to enhance the flavors.
- Water: Just enough to bring the dough together.
Make sure to check out Serious Eats for more kitchen tips on handling pastry dough.
Key ingredients for the filling
- Ricotta cheese: The heart of any classic cannoli filling, giving it that creamy texture.
- Powdered sugar: For a smooth and sweet finish.
- Vanilla extract: A hint of warmth that elevates the flavor profile.
- Mini chocolate chips: These provide a fun texture and a chocolatey surprise in every bite.
- Chopped nuts (optional): Pistachios or almonds are fantastic for an extra crunch and flavor.
With these ingredients, you’re ready to take on the delightful challenge of making classic cannoli squares that will impress your friends and satisfy your cravings!
Step-by-Step Preparation of Classic Cannoli Squares
When you’re ready to dive into the world of classic cannoli squares, this step-by-step guide will make the process a breeze! Whether you’re a baking novice or a dessert connoisseur, you’ll find it easy to craft these delicious treats in no time.
Gather all your ingredients
Before you start your culinary adventure, make sure you have everything you need. Gather:
-
For the dough:
-
1 ½ cups all-purpose flour
-
2 tablespoons sugar
-
½ teaspoon salt
-
1 tablespoon unsalted butter (softened)
-
1 large egg
-
1 tablespoon water (as needed)
-
For the filling:
-
2 cups ricotta cheese (drained)
-
1 cup powdered sugar
-
½ teaspoon vanilla extract
-
½ cup mini chocolate chips
-
¼ cup crushed pistachios (optional, for topping)
Make sure to check your pantry for fresh ingredients and consider using a quality ricotta cheese for a richer flavor. You’ll thank yourself later!
Prepare the cannoli dough
Now that you have your ingredients, it’s time to whip up the cannoli dough.
- In a large mixing bowl, combine the flour, sugar, and salt.
- Add the softened butter and mix until it resembles coarse crumbs.
- Beat the egg in a separate bowl and add it to the flour mixture. Mix until the dough starts to come together.
- If the dough is too dry, add water a tablespoon at a time until it’s fully combined.
- Knead the dough for about 5-10 minutes until it is smooth and elastic. Wrap it in plastic wrap and let it rest for at least 30 minutes.
Why let the dough rest? It’s like letting your muscles recover after a workout! The gluten in the flour relaxes, making your dough easier to roll out.
Bake the cannoli shells to perfection
Once your dough has rested, it’s time to roll it out and cut it into squares.
- Preheat your oven to 375°F (190°C).
- On a floured surface, roll out your dough to about 1/8 inch thick.
- Cut the dough into squares (about 3×3 inches). This size is perfect for your classic cannoli squares.
- Place the squares on a baking sheet lined with parchment paper.
- Bake them for about 15 minutes or until they’re golden brown. Keep an eye on them—nobody likes over-baked shells!
Make the delicious filling
While your cannoli shells are cooling, whip up the filling:
- In a mixing bowl, stir together the ricotta cheese, powdered sugar, and vanilla extract until smooth.
- Fold in the mini chocolate chips gently—this is where you get to add a bit of pizzazz!
- Transfer the filling into a piping bag (or a plastic bag with the corner snipped off).
Have you ever tried adding a splash of espresso to the filling for an extra kick? It takes the flavors to a whole new level!
Assemble your classic cannoli squares
Now comes the fun part—assembling your classic cannoli squares!
- Once the shells have cooled, cut each square in half.
- Using your piping bag, fill each half with the ricotta mixture generously.
- Place the two halves back together to form squares.
- If desired, sprinkle with crushed pistachios for a lovely finishing touch.
Chill and serve
Finally, let your assembled squares chill in the refrigerator for at least 30 minutes. This time allows the flavors to meld together perfectly. When you’re ready to serve, dust with additional powdered sugar and enjoy!
There you have it—a complete step-by-step guide to creating classic cannoli squares. Perfect for gatherings or a special treat at home, these will surely impress your friends and family. Happy baking!
Consider browsing Food Network or Serious Eats for more delightful tips and inspiration!
Variations on Classic Cannoli Squares
When you think of classic cannoli squares, it’s hard not to salivate over the creamy ricotta filling and that crispy shell. But why stop there? These delightful treats are completely adaptable, allowing you to bring in unique flavors that will impress your friends and family. Let’s dive into a couple of variations that may just become your new favorites!
Chocolate Chip Cannoli Squares
For those who believe that chocolate makes everything better, these chocolate chip cannoli squares are a must-try. Adding mini chocolate chips not only enhances that sweet creamy filling but also gives a delightful texture to each square.
- Filling Tip: Simply fold in a cup of mini chocolate chips into the ricotta mixture before layering it on the crust.
- Presentation: Top with additional chocolate chips and a dusting of powdered sugar for an extra touch of elegance.
Nutty Cannoli Squares with Almonds
If you’re a fan of nuts, these nutty cannoli squares with almonds offer a fantastic crunch that complements the smooth filling beautifully.
- How to Add Almonds: Incorporate finely chopped almonds into the ricotta filling or sprinkle them on top for a lovely garnish.
- Flavor Boost: Consider adding a dash of almond extract to the ricotta for that lovely nutty aroma!
By experimenting with these variations, you can create your own signature classic cannoli squares. Whether you lean towards the richness of chocolate or the crunch of nuts, there’s a version for everyone. So why not try one of these ideas the next time you whip up a batch? For more ideas, check out this guide on flavor pairings for your desserts!
Cooking Tips and Notes for Classic Cannoli Squares
Ensuring the Right Texture for the Filling
To create classic cannoli squares that wow your taste buds, focus on the texture of the filling. The ideal filling should be creamy with a slight graininess from the ricotta cheese. Choose whole-milk ricotta for richness. To ensure smoothness, drain the ricotta overnight in a cheesecloth to remove excess moisture. This step is crucial—nobody likes a soggy dessert!
Tips for Achieving Crispy Cannoli Shells
The hallmark of any great classic cannoli squares is the crispy shell. Use a mix of all-purpose flour and a pinch of sugar for flavor. When frying, maintain the oil temperature (around 350°F/175°C) for perfect crispiness. If the temperature dips too low, your shells will absorb oil and become greasy. For a healthier option, consider baking them instead. Keep an eye on them, though; a few extra minutes can mean the difference between perfect and burnt.
For more practical frying techniques, you can check out Serious Eats for detailed guides that will elevate your cooking game!
Serving Suggestions for Classic Cannoli Squares
Pairing with Coffee or Tea
Classic cannoli squares are a delightful dessert that can elevate your coffee or tea time! The creamy filling and flaky crust complement the robust flavors of coffee beautifully. Try serving them alongside a rich espresso or a smooth cappuccino for a truly indulgent experience. If you prefer tea, a robust Earl Grey or a comforting chamomile can contrast the sweetness perfectly. The warmth of the drink enhances the experience of savoring every bite of the cannoli squares.
Presentation Ideas for Special Occasions
Make your classic cannoli squares the star of your dessert table at your next gathering!
- Individual Servings: Cut them into smaller squares and serve them in elegant cupcake liners for a stylish touch.
- Garnishing Touch: Sprinkle with powdered sugar and add a few chocolate shavings on top for a gourmet feel.
- Themed Plates: Use seasonal plates or platters to showcase your squares, adding a personal touch to the presentation.
Elevating the presentation not only makes the dessert visually appealing but also heightens the anticipation among your guests. A memorable dessert experience is all about the details! Check out tips from Good Housekeeping for more creative serving ideas.
Time Breakdown for Classic Cannoli Squares
When you’re ready to whip up a delightful dessert, knowing the timing can make all the difference. Here’s a quick breakdown for your classic cannoli squares:
Preparation Time
Getting started on these treats typically takes about 20-30 minutes. This gives you enough time to gather ingredients, mix them together, and prepare the dish for baking.
Baking Time
Once your mixture is ready, pop it in the oven! The baking will take around 30-35 minutes, during which your kitchen will fill with the irresistible aroma of baked goodness.
Total Time
In total, you’re looking at about 1 hour from prep to table. It’s a small investment for a reward that’s simply delicious—perfect for a weekend gathering or a midweek treat.
For more tips on making your classic cannoli squares, check out baking guides on Bake from Scratch or Serious Eats for deeper insights!
Nutritional Facts about Classic Cannoli Squares
When indulging in classic cannoli squares, it’s essential to know what your taste buds are enjoying. Each serving typically packs about 150-200 calories, making it a delightful yet manageable treat.
Key Nutrients
These squares are not just sweet; they provide some key nutrients too! You’ll find:
- Calcium: Great for bone health, thanks to ricotta cheese.
- Protein: A boost from the dairy and eggs.
In moderation, these treats can fit into a balanced diet.
Sugar Content
As with many desserts, the sugar content of classic cannoli squares is significant, usually around 10-15 grams per serving. While it adds sweetness, it’s wise to savor them rather than overindulge.
For a deeper dive into nutrition, check out Healthline’s guide on the benefits of various food groups, helping you balance treats like classic cannoli squares with your daily intake. Enjoy responsibly!
FAQs about Classic Cannoli Squares
Can I make these squares ahead of time?
Absolutely! One of the great things about classic cannoli squares is that they actually taste better after a day in the fridge. Preparing them in advance allows the flavors to meld beautifully. You can make the filling and the crust separately, then assemble them right before serving to maintain that delightful crunch. Ideally, try to enjoy your delicious creation within three days for the best texture and taste.
What storage tips will keep them fresh?
To keep your classic cannoli squares fresh, consider the following tips:
- Refrigeration: Always store them in an airtight container in the fridge. This keeps them from absorbing unwanted odors and maintains their creamy filling.
- Separation: If possible, store the crust and filling separately. This prevents the crust from becoming soggy and ensures your squares stay crisp longer.
- Freezing: You can also freeze the squares if you want to prepare them far in advance. Wrap each piece tightly in plastic wrap and place them in a freezer-safe container. They can last up to two months in the freezer!
Are there gluten-free options available?
Yes, indeed! You can make classic cannoli squares gluten-free by substituting traditional flour with a gluten-free blend. Just ensure that the blend you choose is suitable for baking (read more from the Gluten Intolerance Group). Many gluten-free flours do a great job of mimicking the texture of regular all-purpose flour, which means you won’t miss a thing in terms of flavor and texture. Happy baking!
Conclusion on Classic Cannoli Squares
Recap of the Joy of Making and Sharing Cannoli Squares
Creating classic cannoli squares is not just about whipping up a dessert; it’s an experience brimming with joy and tradition. From the moment you mix the ricotta and chocolate chips to the final, satisfying bite of creamy filling nestled within crisp layers, every step brings a smile. Sharing these delightful squares with family and friends allows you to spread the happiness that comes from baking. Think about it: nothing beats the sight of loved ones diving into a pan of handmade cannoli squares! So, gather your ingredients, embrace the process, and make memories that will last—your loved ones will thank you for it!
For more inspiration on baking, check out sources like The Kitchn for tips on dessert recipes that celebrate homemade goodness.
PrintClassic Cannoli Squares: Easy Indulgence for Home Bakers

Indulge in the delightful flavors of traditional Italian cannoli reimagined in an easy-to-make square dessert. Perfect for home bakers looking to impress!
- Prep Time: 20 minutes
- Cook Time: 30 minutes
- Total Time: 50 minutes
- Yield: 12 servings 1x
- Category: Dessert
- Method: Baking
- Cuisine: Italian
- Diet: Vegetarian
Ingredients
- 2 cups all-purpose flour
- 1/2 cup unsweetened cocoa powder
- 1/4 cup powdered sugar
- 1/2 cup unsalted butter, cold and diced
- 1 large egg yolk
- 1/4 cup whole milk
- 1 cup ricotta cheese
- 1/2 cup mascarpone cheese
- 3/4 cup granulated sugar
- 1 teaspoon vanilla extract
- 1/2 cup mini chocolate chips
- 1/4 cup chopped pistachios (for garnish)
Instructions
- Preheat your oven to 350°F (175°C).
- In a large bowl, combine the flour, cocoa powder, and powdered sugar.
- Add the cold butter and mix until crumbly.
- Stir in the egg yolk and milk until the dough forms.
- Press the dough into a greased baking pan.
- In another bowl, mix the ricotta, mascarpone, granulated sugar, and vanilla extract until smooth.
- Fold in the chocolate chips.
- Spread the filling over the dough and bake for 25-30 minutes.
- Let cool before cutting into squares.
- Garnish with chopped pistachios before serving.
Notes
- For a nut-free version, omit the pistachios.
- Make sure the ricotta is well-drained for a smoother filling.
Nutrition
- Serving Size: 1 square
- Calories: 250
- Sugar: 15g
- Sodium: 200mg
- Fat: 12g
- Saturated Fat: 7g
- Unsaturated Fat: 4g
- Trans Fat: 0g
- Carbohydrates: 30g
- Fiber: 2g
- Protein: 4g
- Cholesterol: 45mg
Keywords: Classic Cannoli Squares, Italian dessert, easy baking, home bakers