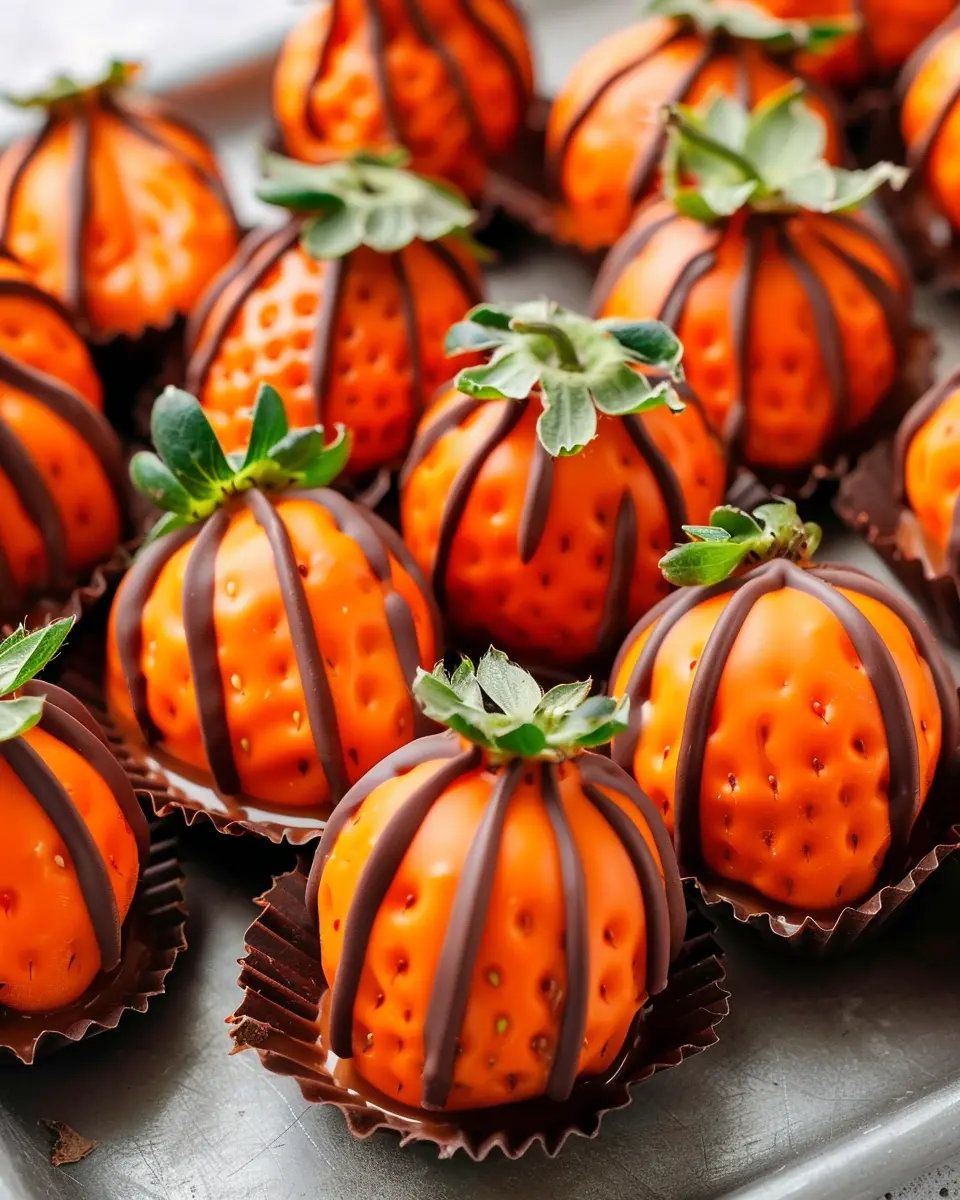
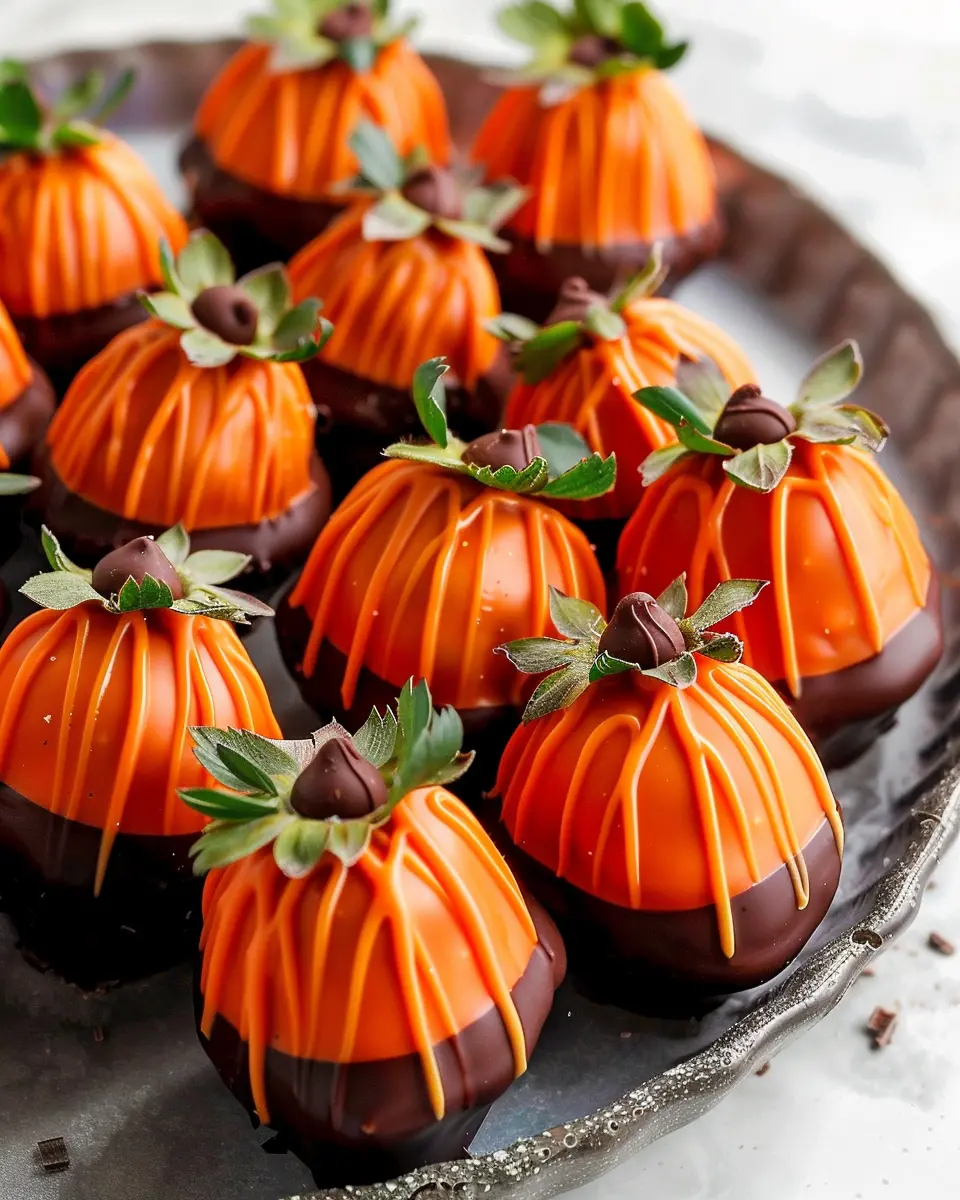
Introduction to Pumpkin Patch Strawberries
Fall is a magical season, filled with colors, flavors, and the spirit of togetherness. As the leaves turn golden and pumpkins dominate the market, why not bring a bit of that festive cheer into your kitchen? This is where pumpkin patch strawberries come in—a delightful combination of autumn vibes and the sweetness of chocolate-covered strawberries.
Why pumpkin patch strawberries are the perfect homemade treat
Creating pumpkin patch strawberries is not just a culinary project; it’s an experience you can share with friends and family! Imagine gathering around the kitchen, melting chocolate and dipping juicy strawberries while laughter fills the air. This seasonal treat adds a fun twist to traditional chocolate-covered strawberries. Plus, they’re incredibly easy to make! Just a few simple ingredients turn ordinary strawberries into whimsical pumpkin-like treats that brighten up any fall-themed gathering.
Incorporating these delightful desserts into your festivities not only allows you to express your creativity but also caters to the growing trend of seasonal eating. According to a report from the National Retail Federation, nearly 70% of Americans celebrate Halloween, which makes pumpkin-inspired recipes like this incredibly popular and highly shareable.
Here’s why pumpkin patch strawberries are a must-try this fall:
- Creative Presentation: With everything from chocolate to sprinkles, decorating your strawberries is half the fun! It’s a perfect way to unleash your inner artist.
- Fall Flavor: Incorporate spice by using different chocolate varieties—think white chocolate with cinnamon for a touch of autumn warmth.
- Versatile Base: Strawberries are not only delicious but also a guilt-free indulgence packed with vitamins and antioxidants. They provide a sweet counterbalance to the rich chocolate.
And who doesn’t love the joy of making something that looks as good as it tastes? With a little help from your family or friends, you’ll have a beautifully arranged platter that serves as not just a treat, but also a centerpiece for your fall gatherings.
So, get those strawberries washed and ready—you’re going to create something that’s as delightful to look at as it is to eat!
Ingredients for Pumpkin Patch Strawberries
Creating your own pumpkin patch strawberries is not only a fun fall activity but also a delightful treat that impresses friends and family. Let’s dive into what you’ll need to make these adorable chocolate-covered strawberries!
Essential Ingredients for the Base
To get started, here are your main ingredients:
- Fresh Strawberries: Choose ripe, plump strawberries for the best flavor and appearance.
- Chocolate: You can use dark, milk, or white chocolate—just make sure it’s high-quality for smooth melting and rich taste.
- Coconut Oil: A little bit of coconut oil helps achieve that perfect coating consistency when melting chocolate.
Don’t forget to prep your strawberries properly by rinsing them and letting them dry completely. This ensures that the chocolate adheres well!
Decorations and Garnishes
Now, let’s bring the fall theme to life with these fun ideas:
- Orange Sprinkles: These mimic pumpkin hues perfectly and add some crunch.
- Green Candy Melts or Royal Icing: These can be used to create little vines or leaves on your strawberries.
- Chocolate Drizzle: Using a contrasting chocolate for drizzling adds a gourmet touch.
By incorporating these ingredients, you’re crafting not just a treat but a visual centerpiece that screams autumn! For more inspiration on seasonal treats, check out this guide on festive dessert ideas.
Preparation of Pumpkin Patch Strawberries
Making pumpkin patch strawberries is a fun and creative way to celebrate fall! These delightful chocolate-covered strawberries are perfect for parties, family gatherings, or even just as a festive treat for yourself. Below, I’ve outlined the preparation steps to make this sweet and seasonal delight. Let’s dive in!
Gather Your Ingredients
To kick off your festive project, you’ll need to gather a handful of key ingredients. Shopping for these goodies can be part of the fun! Here’s what you’ll need:
- Fresh strawberries (preferably medium to large)
- Orange candy melts or white chocolate (for the base coating)
- Green candy melts (or chocolate dyed green for the leaves)
- A small, sharp knife (for decorating)
- Wax paper or parchment paper (for drying)
- Optional: edible glitter or sprinkles for extra flair
A trip to your local grocery store or farmer’s market will yield pretty much everything on this list. If you’re looking for high-quality chocolate or candy melts, consider checking out specialty stores or reputable online suppliers.
Wash and Dry the Strawberries
Before you dip those luscious berries into chocolate, make sure they’re clean and dry. Here’s how to prepare your strawberries:
- Rinse the strawberries under cool water to remove any dirt or pesticides.
- Gently pat them dry with a clean kitchen towel or paper towels. Make sure there’s no moisture left, as it can cause the chocolate to seize when dipping.
Inspect your strawberries closely—look for any blemishes or soft spots. Selecting the freshest strawberries will ensure your pumpkin patch strawberries are as delicious as they are visually appealing.
Prepare the Chocolate Coating
There’s something truly satisfying about melting chocolate, isn’t there? It’s like magic in the kitchen! Here’s how to get the chocolate ready for dipping:
- Place the candy melts in a microwave-safe bowl. For a smooth, creamy consistency, start with about one cup of orange candy melts.
- Heat in the microwave in 30-second intervals, stirring between each interval until melted and smooth.
Be cautious not to overheat the chocolate, as it can become clumpy. If you’re melting chocolate on the stovetop, use a double boiler for better control over the temperature. Mix in a teaspoon of vegetable oil if you want a thinner consistency.
Dip and Coat the Strawberries
Now the fun part begins! It’s time to dip your strawberries into the magical world of chocolate. Here’s how to do it:
- Hold a strawberry by its green leaf (the natural handle) and dip it into the melted chocolate. Swirl it around to ensure it gets fully coated.
- Allow any excess chocolate to drip back into the bowl.
- Place the dipped strawberry on the wax or parchment paper.
Repeat this process for all your strawberries. If you’d like the coating to be thicker, you can let the first layer set for a few minutes and dip again!
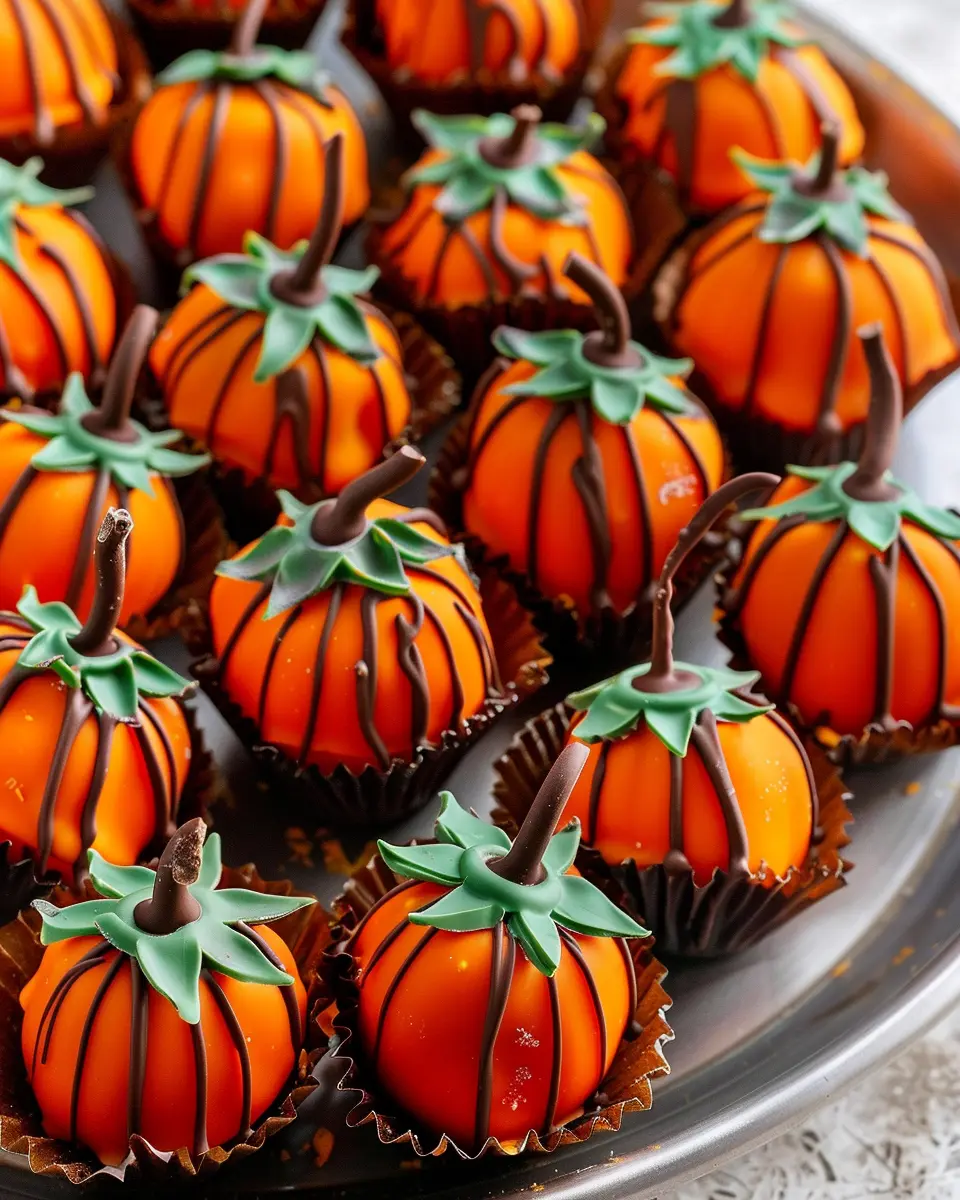
Add the Decorative Touches
The final step for your pumpkin patch strawberries is to add those charming details that truly bring them to life. Here’s how:
- Melt the green candy melts and use a piping bag or a ziplock bag with a corner snipped off to draw little leaves and vines on the berries.
- For a bit of sparkle, sprinkle edible glitter or add sprinkles while the chocolate is still wet to make your treats extra special.
And voilà! You’ve created delightful pumpkin patch strawberries that are sure to impress all your friends and family. Not only are they delicious, but they also embody the spirit of autumn with their festive colors and shapes.
Feel free to experiment with variations! You could use dark or milk chocolate instead or try adding different toppings that reflect the season. Happy decorating and enjoy your seasonal treats!
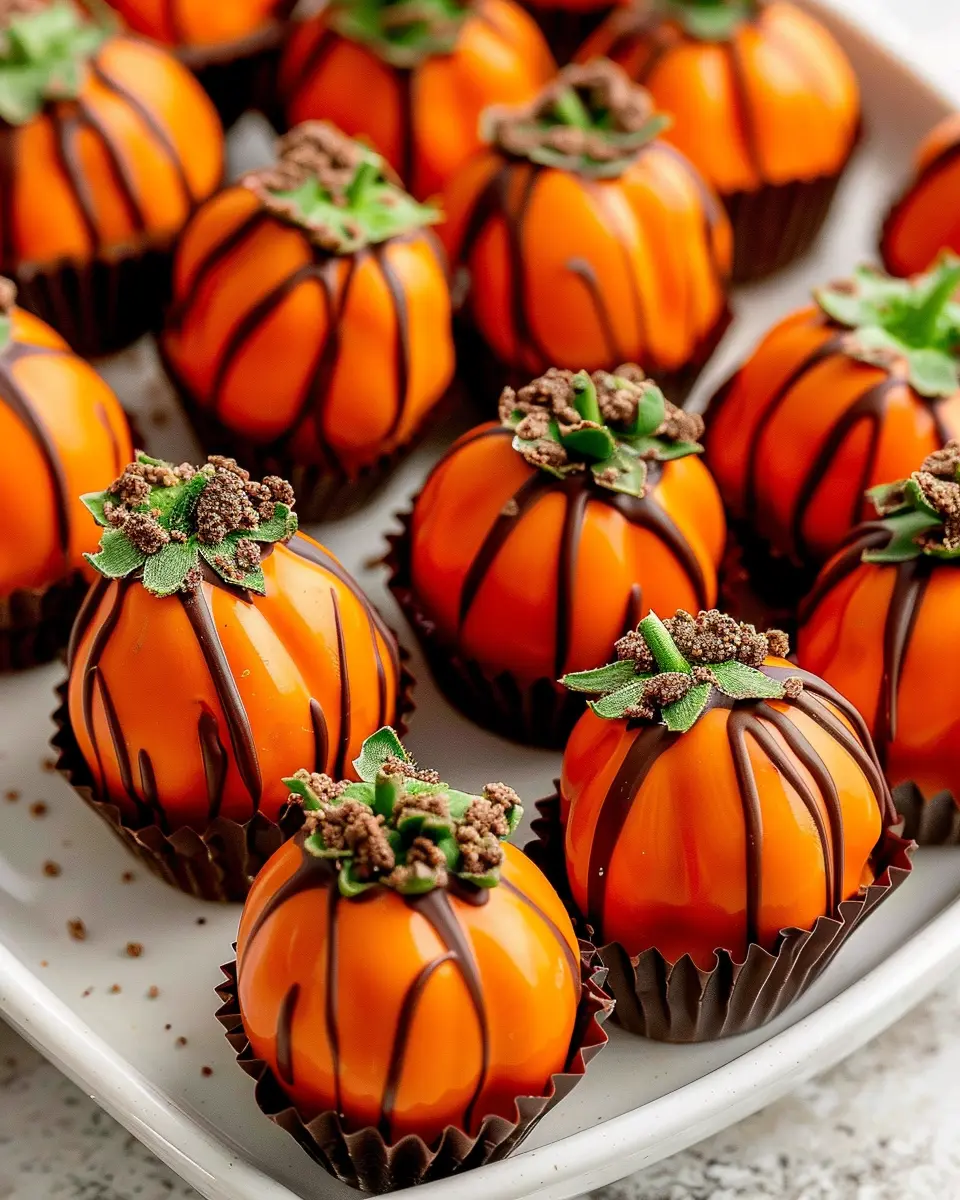
Variations of Pumpkin Patch Strawberries
Chocolate Orange Pumpkin Patch Strawberries
If you’re looking to take your pumpkin patch strawberries to the next level, why not give them a delicious twist with a chocolate orange flavor? It’s surprisingly simple! Just mix a bit of orange zest and a few drops of orange extract into your melted chocolate before dipping the strawberries. The bright, citrusy notes perfectly complement the rich chocolate, giving a nod to the fall season while maintaining that sweet, pumpkin-inspired essence. You could even sprinkle some crushed orange candy for an eye-catching finish. Your guests will be coming back for more in no time!
Extra Spooky Decoration Ideas
The aesthetics of your pumpkin patch strawberries can be as fun as the flavors! Embrace the Halloween spirit with some extra spooky decorations. Here are a few ideas:
- Ghostly Whipped Cream: Use piped whipped cream to create little ghost faces on top of your dipped strawberries. Just a dot of dark chocolate can serve as eyes!
- Pumpkin Faces: After dipping your strawberries in orange chocolate, use melted dark chocolate to draw jack-o’-lantern faces.
- Spiders and Webs: Use black licorice or melted chocolate to form spider shapes which can be placed atop your strawberries for a creepy touch.
For further inspiration, you might want to check out resources like Taste of Home or Food Network for creative variations on festive desserts.
By exploring these variations and decoration ideas, you’ll not only impress your friends but also add a delightful touch to your fall gatherings! Happy decorating!
Cooking Tips and Notes for Pumpkin Patch Strawberries
Choosing the Right Strawberries
When making your Pumpkin Patch Strawberries, it all starts with selecting the best strawberries. Look for firm, ripe berries that are deep red in color, with no signs of bruising. Fresh strawberries from local farmers’ markets can add a lovely flavor, while organic options often have a more vibrant taste. For a festive touch, pick medium to large-sized strawberries; they’ll hold the chocolate coating beautifully and provide ample space for your creative designs.
How to Store Your Decorated Strawberries
After decorating your pumpkin patch strawberries, proper storage is key. Place them in a single layer on a parchment-lined baking sheet. You can place them in the fridge to help set the chocolate, but avoid stacking them. They should ideally be consumed within 24 hours for the best taste and freshness. If you need to store them longer, consider vacuum-sealing or freezing them without chocolate. This keeps your berries fresh for future treats!
For more tips on preserving fruits, check out this informative article from the United States Department of Agriculture.
Serving suggestions for Pumpkin Patch Strawberries
Perfect pairings with a fall-themed dessert table
When it comes to creating a stunning fall-themed dessert table, pumpkin patch strawberries are a charming addition. Think about surrounding these delightful treats with other seasonal favorites like spiced cupcakes, caramel apple bites, and pumpkin pie bars. Adding warm tones through decorations—such as orange linens, burlap accents, and little pumpkins—will reinforce that cozy autumn vibe.
To elevate the experience, consider serving these strawberries alongside a hot chocolate station featuring gourmet toppings, like whipped cream and chocolate shavings, perfect for the crisp fall air. For something refreshing, pair them with spiced apple cider, creating delightful flavor contrasts that guests will adore.
Gift ideas and presentation tips
Gift-giving with pumpkin patch strawberries is a sweet idea! Arrange them in a rustic basket lined with autumn leaves or use eco-friendly packaging like kraft boxes tied with twine. A thoughtful note adds a personal touch that recipients will appreciate.
For an extra flair, consider adding a sprinkle of edible gold for a touch of elegance or crafting a fun label that describes your creation—a creative approach that adds both charm and meaning. You can also learn more about creative gift packaging ideas from The Spruce.
Serving up pumpkin patch strawberries not only enhances your gatherings but also showcases the beauty of fall in every delicious bite.
Time Breakdown for Pumpkin Patch Strawberries
Creating your pumpkin patch strawberries is a delightful autumn activity! To help you manage your time efficiently, here’s a quick breakdown:
Preparation Time
Getting started is a breeze. Set aside about 20 minutes to wash and dry your strawberries, melt the chocolate, and prepare your decoration materials. Make sure everything is organized to stream quickly.
Decoration Time
Once your strawberries are ready, you’ll need about 30 minutes for the fun part—decorating! This is where you can creatively transform your strawberries into adorable mini pumpkins, adding vibrant colors and textures.
Total Time
In total, expect to spend around 50 minutes crafting your pumpkin patch strawberries. Perfect for a cozy evening with friends, and definitely worth the time for the festive treat you’ll create!
For more ideas, check out this guide on seasonal treats and enjoy the autumn vibes!
Nutritional Facts for Pumpkin Patch Strawberries
Calories
Each serving of pumpkin patch strawberries delivers about 200 calories. This indulgence provides a delightful option for a fall-themed treat without overwhelming your daily caloric intake.
Sugar Content
You’ll find approximately 16 grams of sugar in a serving. This includes natural sugars from fresh strawberries, along with a hint from the chocolate coating. While it’s a bit higher than some snacks, it’s also paired with vital nutrients.
Nutritional Benefits of Strawberries
Strawberries aren’t just tasty; they’re also packed with health benefits! They are an excellent source of vitamin C, providing more than 100% of the daily recommended intake in just one cup. Rich in antioxidants, they support heart health and can improve skin quality. Plus, their fiber content aids digestion, making pumpkin patch strawberries a guilt-free dessert option.
Looking for more on the amazing benefits of strawberries? Check out this article from the USDA for in-depth nutrition statistics.
Enjoy these fresh, festive treats knowing that they not only please your palate but also nourish your body!
FAQs about Pumpkin Patch Strawberries
Can I use white chocolate instead of dark?
Absolutely! While the traditional look for your pumpkin patch strawberries often involves dark chocolate for that rich contrast, white chocolate can bring a delightful sweetness and brightness to the mix. If you choose to go this route, consider adding a touch of orange food coloring to give your strawberries that true autumn vibe. This way, you can enjoy the taste and aesthetics without sacrificing the festive feel.
What’s the best way to transport decorated strawberries?
Transporting your decorated pumpkin patch strawberries can be tricky, but a little preparation can go a long way. Here are some tips to keep your strawberries safe and looking sharp:
- Use a sturdy container: A shallow, flat container works best. Line it with parchment paper to absorb any moisture.
- Keep them cool: If possible, transport them in a cooler or insulated bag to maintain their freshness.
- Refrigerate until just before serving: This reduces the risk of melting chocolate and sogginess.
Whether you’re bringing them to a party or displaying them at home, these tips will help ensure your strawberries arrive in perfect condition.
How long do they last once decorated?
Once you’ve lovingly decorated your pumpkin patch strawberries, they’ll typically last about 1-2 days in the refrigerator. Keeping them in an airtight container can help preserve freshness. However, the sooner you enjoy them, the better! They taste best when the chocolate is still crisp, and the strawberries are at their peak freshness. For more detailed storage tips, you might check out expert opinions on how long chocolate-covered fruits can stay fresh.
By following these guidelines, you’ll not only enjoy the process of making these festive treats but also impress your friends and family with your culinary creativity this fall!
Conclusion on Pumpkin Patch Strawberries
Why you should give this treat a try
Embrace the fall spirit with these delightful pumpkin patch strawberries! Not only do they bring a festive vibe to your gatherings, but their delicious combination of chocolate and strawberries caters to all ages. Imagine sharing these treats with friends or family while enjoying cool autumn days.
Creating pumpkin patch strawberries is simpler than you might think, requiring just a few ingredients and a bit of creativity. Whether you’re prepping for a cozy get-together or looking for a fun weekend project, these treats are sure to impress. Plus, indulging in chocolate-covered strawberries has never been more seasonal!
If you’re eager to up your dessert game, give this recipe a spin! Check out sources like The Spruce Eats for more creative fall recipes. Happy decorating!
PrintPumpkin Patch Strawberries: Indulgent Fall-Themed Treats
Delight in these indulgent pumpkin patch strawberries, perfect for fall celebrations and gatherings.
- Prep Time: 15 minutes
- Cook Time: 10 minutes
- Total Time: 25 minutes
- Yield: 12 servings 1x
- Category: Dessert
- Method: No-bake
- Cuisine: American
- Diet: Vegetarian
Ingredients
- 1 pound fresh strawberries
- 8 ounces chocolate melts
- 1 cup crushed graham crackers
- 1/2 teaspoon orange extract
- 1 tablespoon coconut oil
- 1 packet green candy melts (for leaves)
Instructions
- Wash and dry the strawberries thoroughly.
- In a microwave-safe bowl, melt the chocolate melts with coconut oil in 30-second intervals, stirring until smooth.
- Dip each strawberry in the melted chocolate, allowing excess to drip off.
- Immediately roll the chocolate-coated strawberries in crushed graham crackers to create a ‘dirt’ look.
- Melt the green candy melts and use them to create small leaves on top of each strawberry.
- Allow the strawberries to set on parchment paper until chocolate hardens.
Notes
- For a fun variation, add orange food coloring to the chocolate before dipping.
- Store in a cool place to keep the chocolate from melting.
Nutrition
- Serving Size: 1 strawberry
- Calories: 120
- Sugar: 10
- Sodium: 50
- Fat: 8
- Saturated Fat: 5
- Unsaturated Fat: 2
- Trans Fat: 0
- Carbohydrates: 11
- Fiber: 1
- Protein: 1
- Cholesterol: 0
Keywords: Pumpkin Patch Strawberries, Chocolate Covered Strawberries, Fall Treats, Halloween Snacks